Kubernetes Deployment YAML file

How to create a Kubernetes Deployment YAML file? How to use Declarative YAML configuration in Kubernetes?
In my last tutorial, I have deployed a containerized application in Kubernetes using the imperative approach. For this topic, I will discuss the Declarative approach of managing Kubernetes objects using YAML configuration files.
Recap on kubectl commands
kubectl create deployment webapp-for-testing --image=rexresurreccionhome/webapp-for-testing
kubectl expose deployment webapp-for-testing --type=NodePort --port=8080
By this time, we are now familiar on some of the kubectl commands that I used on my last tutorial to deploy a Pod. And we’ve seen how to apply configurations as parameters to those commands. For example, I specified the container image, port number and the type of network exposure for my web application.
Kubernetes Deployment YAML Example
Pod Deployment
Now I will use those kubectl command parameters for deploying a Pod into a YAML file.
apiVersion: apps/v1
kind: Deployment
metadata:
  name: webapp-testing-deployment
spec:
  replicas: 1
  selector:
    matchLabels:
      app.rex/name: webapp-example
  template:
    metadata:
      labels:
        app.rex/name: webapp-example
    spec:
      containers:
        - name: webapp-example-node
          image: rexresurreccionhome/webapp-for-testing:latest
          imagePullPolicy: Always
Let’s go over the configurations in this example:
apiVersion– What API version to use. As of writing this topic, the latest version isapps/v1.kind– What kind of object the configuration applies. In this example, I’m creating a Deployment object.metadata– Metadata for the object.metadata.name– The name for the object. In here, I named my Deployment object “webapp-testing-deployment”.spec– Specification for the object. Since my configuration is a kind of Deployment, the specification are for deploying a Kubernetes Pod.spec.replicas– The number of Pod replicas to deploy. In this example, I have 1 pod replica to deploy.spec.selector– Matching which Pod(s) will be controlled by this deployment. You can usematchExpressionsormatchLabels. In this example, I’m matching labels with the key value pairapp.rex/name: webapp-example.spec.template– The template for the Pod configuration.spec.template.metadata– Metadata for the Pod.spec.template.metadata.labels– Labels associated with the Pod. This is a user defined key value pair.spec.template.spec– Specification for the Pod.spec.template.spec.containers– List of Pod container configurations. Multiple containers can be deployed with different configurations.spec.template.spec.containers.name– Name for the application container.spec.template.spec.containers.image– Container runtime Image. For instance, a hosted Docker image.spec.template.spec.containers.imagePullPolicy– Policy on how or when should the deployment pull the container runtime image.
As I have mentioned before, in Kubernetes you will be managing objects. And these objects represent the state or resource in your cluster. And in the example above, I specified the object I want to create kind: Deployment, which is a Deployment for a Pod.
To apply a Kubernetes Deployment YAML file, you just need to execute a simple command kubectl apply, passing the full path of the file as parameter.
kubectl apply -f k8s-deployment.yaml


If everything works, you should see one Pod being deployed in the dashboard.
Making changes to your configuration
After a Pod is deployed and a change to the YAML file, you need to run again the kubectl apply command. In my topic about Kubernetes cluster components, I mentioned kube-controller-manager will keep an eye on changes to the state in your cluster. Hence, a change in the configuration (E.g. New container image), will redeploy the Pod(s).
Service
This time, I will create a Service to expose my Pod to my cluster and to the outside world.
apiVersion: v1
kind: Service
metadata:
  name: webapp-testing
spec:
  selector:
    app.rex/name: webapp-example
  ports:
    - protocol: "TCP"
      port: 80
      targetPort: 8080
  type: LoadBalancer
If you notice, many of the configurations here are the same to what I discussed already for a Deployment object. But the difference is the value. For instance, the kind of resource I am creating is a Service object. The selector is a key value pair, that matches the label I specified in my Pod app.rex/name: webapp-example. And the most important part of this configuration is the spec.ports and spec.type. Let’s go over the following network configurations.
spec.ports– List of ports to expose. You can expose one or more Ports that have different configurations.spec.ports.protocol– Network protocol. In this example, since I’m exposing a web application API over HTTP, I used TCP.spec.ports.targetPort– Target port inside the container. Port number your application container is listening to. The traffic using the external port will get mapped to the target Port inside the container.spec.type– Type of exposure for this service.ClusterIP,NodePort,LoadBalancer, orExternalName. Default isClusterIP. If your Kubernetes cluster infrastructure supports load balancing, you can use theLoadBalanceroption.
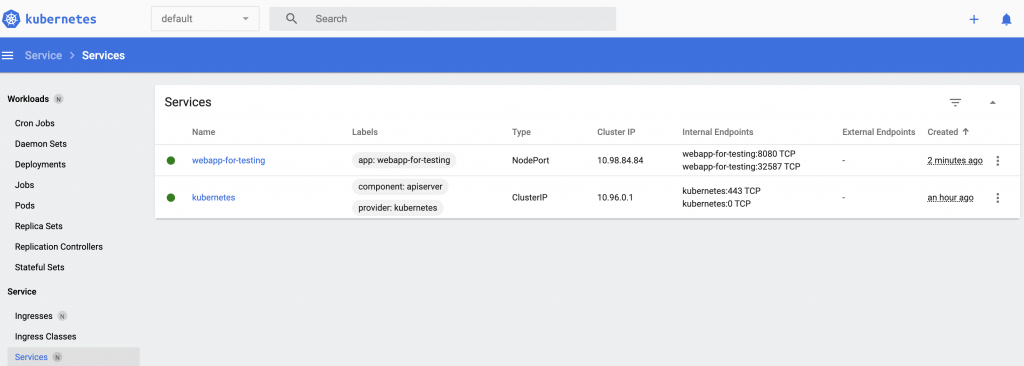
If everything works, you should see a Service being deployed in the dashboard, with the ports, protocol and assigned Pod.
For testing a Minikube deployed Kubernetes Cluster, please follow the steps on my previous topic about the Minikube Tunneling Service on how to expose your Pod.
Label Selector
In my examples, I have used the spec.selector to apply my configurations to a Pod. I just wanted to quickly mention that you can also use selector labels in kubectl commands to match resources. For example, I have a label env: dev, I can use this to delete resources in my development environment. I specified the label using the -l flag.
kubectl delete deployment, service -l env=dev
Combining YAML configuration filess
It is also possible to combine multiple declarative files. Copy your configurations for each resource into one declarative file separated by a “—” triple dash, after each resource object configuration.
apiVersion: v1
kind: Service
metadata:
  name: webapp-testing
spec:
  selector:
    app.rex/name: webapp-example
  ports:
    - protocol: "TCP"
      port: 80
      targetPort: 8080
  type: LoadBalancer

---

apiVersion: apps/v1
kind: Deployment
metadata:
  name: webapp-testing-deployment
spec:
  replicas: 1
  selector:
    matchLabels:
      app.rex/name: webapp-example
  template:
    metadata:
      labels:
        app.rex/name: webapp-example
    spec:
      containers:
        - name: webapp-example-node
          image: rexresurreccionhome/webapp-for-testing:latest
readinessProbe and livenessProbe
To add a finishing touch in my Kubernetes Deployment YAML file, I’m gonna be adding configurations so that Kubernetes will be able to check the health of my containerized application. For instance, if my application process died. Kubernetes will detect that my application is no longer accessible via the endpoint I specified. Then it will try to re-deploy my Pod.
apiVersion: apps/v1
kind: Deployment
metadata:
  name: webapp-testing-deployment
spec:
  replicas: 1
  selector:
    matchLabels:
      app.rex/name: webapp-example
  template:
    metadata:
      labels:
        app.rex/name: webapp-example
    spec:
      containers:
        - name: webapp-example-node
          image: rexresurreccionhome/webapp-for-testing:latest
          imagePullPolicy: Always
          readinessProbe:
            httpGet:
              path: /status
              port: 8080
            periodSeconds: 15
            initialDelaySeconds: 2
          livenessProbe:
            httpGet:
              path: /status
              port: 8080
            periodSeconds: 30
            initialDelaySeconds: 5
The livenessProbe is used by the kubelet to check if your application is still up or if it needs to restart the container. On the other hand, readinessProbe is used by the kublet to know when a container is ready to start accepting traffic. In this example, I’m using a HTTP GET to check a status endpoint. If my application is healthy, this should be accessible within my Cluster network. Read more about this configuration.
Summary
In this tutorial, we’ve learned the Declarative approach in deploying Kubernetes objects. We’ve used the kubectl apply command. I’ve given a Deployment and Service objects as an example. And also applied readinessProbe and livenessProbe Pod health check.
Now that we know what a Declarative approach is, I will be using this moving forward on my Kubernetes discussion. My next topic will be about Kubernetes Service Account and Cluster Role Binding.