Java Maven project testing using Cucumber JUnit

On this topic, I will be discussing how to set up a new Java test suite. This tutorial is for you if you plan to use Java, Maven, Cucumber and JUnit for writing your next QA systems testing project. Also, I will be using IntelliJ IDE to create my Maven project and for running the tests.
First, you will need to install the requirements for Maven, Cucumber, JUnit and IntelliJ and other plugins to follow along. Please read my past tutorial if you have not done this yet.
Set up a new Java Maven project
Maven provides a standardized project templates so you don’t have to create your project structure from scratch.
Create Maven project inside IntelliJ IDE
In my first example, I am creating my project inside IntelliJ IDE with the Maven plugin.
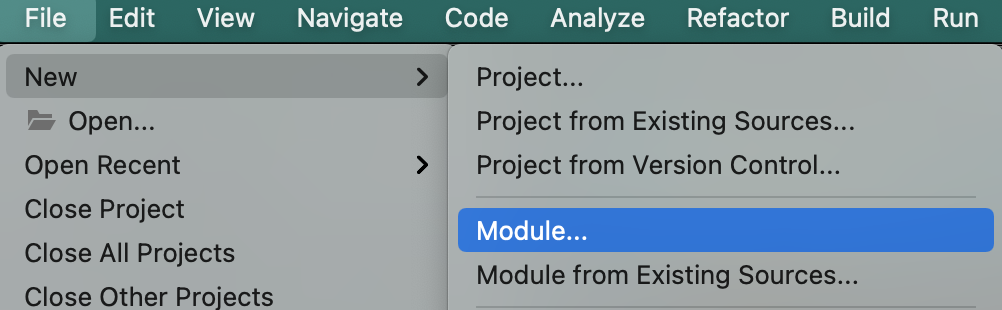
Click on File > New > Module.
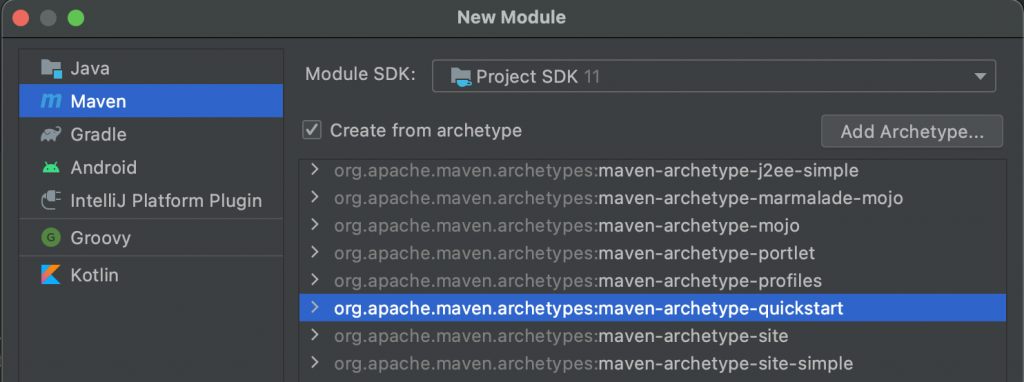
Select Maven from the menu. Then put a check on “Create from archetype”. For this tutorial I’m selecting the maven-archetype-quickstart template. Then click Next.
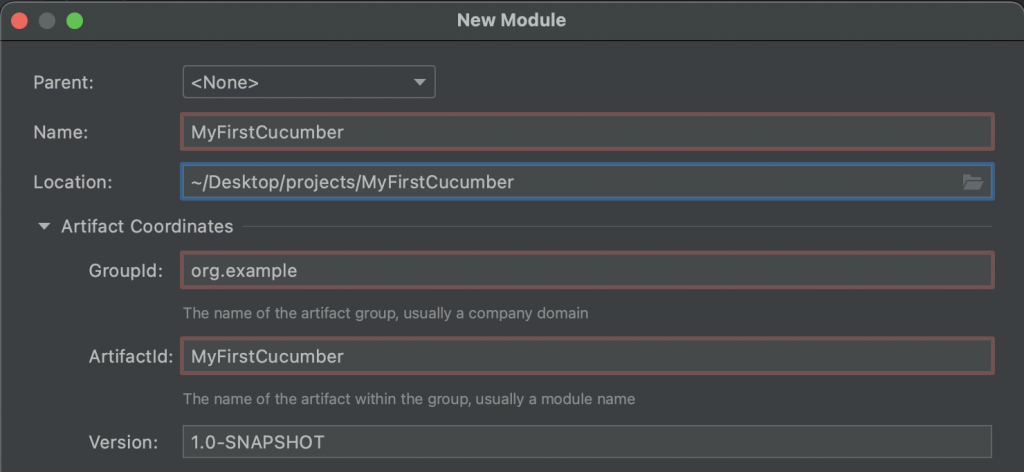
You will need to specify some detail for your project. Give your project a unique name and location. Also, check out the Guide to naming conventions on groupId, artifactId, and version. Click Next, and review your project detail and hit Finish. And that’s it! You have your first Maven project set up.
Create Maven project in CLI
You need to install Apache Maven in your CLI (not the plugin to IntelliJ IDE) as discussed in my previous tutorial. In here, I’m using the mvn command to generate my Maven project.
mvn archetype:generate -B -DgroupId=org.example -DartifactId=MyFirstCucumber -DarchetypeArtifactId=maven-archetype-quickstart -Dversion=0.1-SNAPSHOT
You will notice that I’m also specifying the same properties that I set when creating my project in IntelliJ IDE. Using the -D flag, I applied the groupId, artifactId, version and the Maven template in archetypeArtifactId.
Install pom.xml dependencies
To install the dependencies, you can either do this inside IntelliJ IDE or specify this in your pom.xml file. Adding the dependencies in your pom.xml allow you to push this as part of your commit and it will be easy to build the project dependencies again next time if you plan to share your code repository with your Team.
Below is an example pom.xml that has all the dependencies that we need for this tutorial.
<?xml version="1.0" encoding="UTF-8"?>

<project xmlns="http://maven.apache.org/POM/4.0.0" xmlns:xsi="http://www.w3.org/2001/XMLSchema-instance"
         xsi:schemaLocation="http://maven.apache.org/POM/4.0.0 http://maven.apache.org/xsd/maven-4.0.0.xsd">
  <modelVersion>4.0.0</modelVersion>

  <groupId>org.example</groupId>
  <artifactId>MyFirstCucumber</artifactId>
  <version>1.0-SNAPSHOT</version>

  <name>MyFirstCucumber</name>
  <!-- FIXME change it to the project's website -->
  <url>http://www.example.com</url>

  <properties>
    <project.build.sourceEncoding>UTF-8</project.build.sourceEncoding>
    <maven.compiler.source>1.7</maven.compiler.source>
    <maven.compiler.target>1.7</maven.compiler.target>
  </properties>

  <dependencies>
    <!-- https://mvnrepository.com/artifact/io.cucumber/cucumber-junit -->
    <dependency>
      <groupId>io.cucumber</groupId>
      <artifactId>cucumber-junit</artifactId>
      <version>6.10.4</version>
      <scope>test</scope>
    </dependency>
    <!-- https://mvnrepository.com/artifact/io.cucumber/cucumber-java -->
    <dependency>
      <groupId>io.cucumber</groupId>
      <artifactId>cucumber-java</artifactId>
      <version>6.10.4</version>
    </dependency>
    <!-- https://mvnrepository.com/artifact/io.cucumber/cucumber-testng -->
    <dependency>
      <groupId>io.cucumber</groupId>
      <artifactId>cucumber-testng</artifactId>
      <version>6.10.4</version>
    </dependency>
    <dependency>
      <groupId>junit</groupId>
      <artifactId>junit</artifactId>
      <version>4.11</version>
      <scope>test</scope>
    </dependency>
  </dependencies>

  <build>
    <pluginManagement><!-- lock down plugins versions to avoid using Maven defaults (may be moved to parent pom) -->
      <plugins>
        <!-- clean lifecycle, see https://maven.apache.org/ref/current/maven-core/lifecycles.html#clean_Lifecycle -->
        <plugin>
          <artifactId>maven-clean-plugin</artifactId>
          <version>3.1.0</version>
        </plugin>
        <!-- default lifecycle, jar packaging: see https://maven.apache.org/ref/current/maven-core/default-bindings.html#Plugin_bindings_for_jar_packaging -->
        <plugin>
          <artifactId>maven-resources-plugin</artifactId>
          <version>3.0.2</version>
        </plugin>
        <plugin>
          <artifactId>maven-compiler-plugin</artifactId>
          <version>3.8.0</version>
        </plugin>
        <plugin>
          <groupId>org.apache.maven.plugins</groupId>
          <artifactId>maven-surefire-plugin</artifactId>
          <version>3.0.0-M6</version>
        </plugin>
        <plugin>
          <artifactId>maven-jar-plugin</artifactId>
          <version>3.0.2</version>
        </plugin>
        <plugin>
          <artifactId>maven-install-plugin</artifactId>
          <version>2.5.2</version>
        </plugin>
        <plugin>
          <artifactId>maven-deploy-plugin</artifactId>
          <version>2.8.2</version>
        </plugin>
        <!-- site lifecycle, see https://maven.apache.org/ref/current/maven-core/lifecycles.html#site_Lifecycle -->
        <plugin>
          <artifactId>maven-site-plugin</artifactId>
          <version>3.7.1</version>
        </plugin>
        <plugin>
          <artifactId>maven-project-info-reports-plugin</artifactId>
          <version>3.0.0</version>
        </plugin>
      </plugins>
    </pluginManagement>
  </build>
</project>
Once you have the dependencies saved in your pom.xml file, you can open the project in your IDE and click on Build > Build Project. Just in case pom.xml complain about dependency not found error, go to File > Invalidate Caches. And this action will restart your IntelliJ.
Feature files, step definitions and Test Runner Class
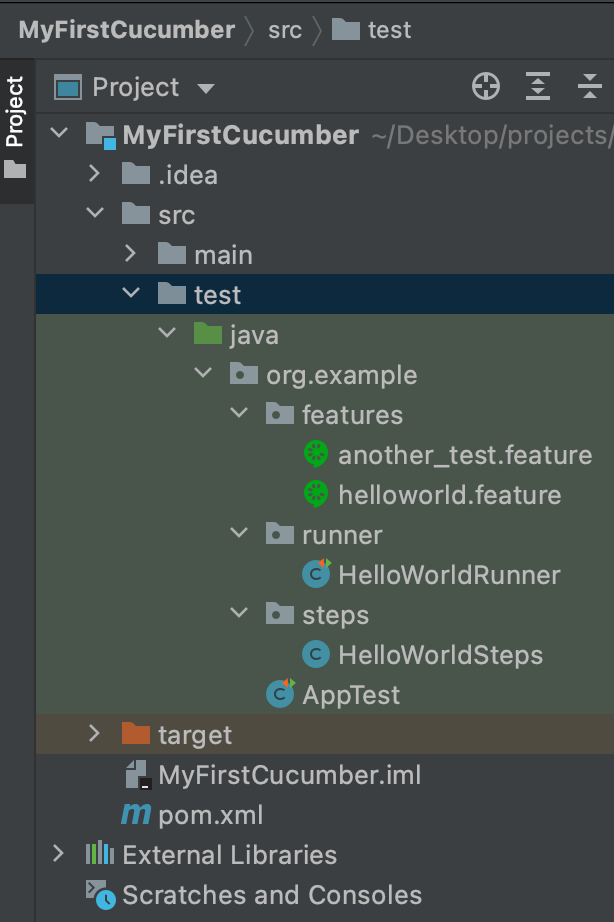
Once you have your Maven project created, you should see a similar folder structure above. In here, I added two packages features and steps. I will be using the features package to store my cucumber test files, and the steps package to store the Java Classes that defines the methods that gets called by the Given, When, Then and And conditions in my test scenarios.
Cucumber test scenarios
Cucumber is a tool that supports a Behavior Driven Development (BDD) approach in testing. Wherein your test cases are written as scenarios. And Gherkin is the language that you use to write your test scenarios in Cucumber. Below are example test scenarios I saved in a file helloworld.feature, with .feature extension.
@hello_world
Feature: Greeting Everybody Hello World

  Scenario: Default Greeting
    Given I am running this test
    When All plugins are installed properly
    Then A Hello World greeting is an output
    And The last line is Hi World

  Scenario: Another Greeting able to use the same step definition
    Given I am running this test
    When All plugins are installed properly
    Then A Hello World greeting is an output
    And The last line is Hello World
In this example, I have two test scenarios. It is a good practice to reuse existing step definitions when applicable to avoid redundant codes. For demonstration, the second scenario here has the same description for the Given, When and Then conditions. Also, notice the tag @hello_world that I will be using later to run my test scenarios using JUnit.
Cucumber step definitions
The next thing we need to do is define what happens to a test scenario when it runs. These will be the methods in your Java class that handles the logic for your testing.
package org.example.steps;

import io.cucumber.java.en.And;
import io.cucumber.java.en.Given;
import io.cucumber.java.en.Then;
import io.cucumber.java.en.When;


public class HelloWorldSteps {

    @Given("^I am running this test$")
    public void runTest() {
        System.out.println("Test running in default step test");
    }

    @When("^All plugins are installed properly$")
    public void pluginsInstalled() {
        System.out.println("Plugins are installed");
    }

    @Then("^A Hello World greeting is an output$")
    public void helloWorldGreeting() {
        System.out.println("Hello World!");
    }

    @And("^The last line is Hi World$")
    public void lastLineHiWorld() {
        System.out.println("Hi World!");
    }

    @And("^The last line is Hello World$")
    public void lastLineHelloWorld() {
        System.out.println("Hello World!");
    }
}
In this example, when a description for the conditions Given, When, Then and And are matched, it will call the matching class method. Imagine that these methods are used in your project to set payload, send request to another application, or do an assertion to verify if a response is correct. For this tutorial I am only printing an output just to show that these methods are actually called when I run the tests defined in my feature files.
Run Cucumber tests directly in the feature file
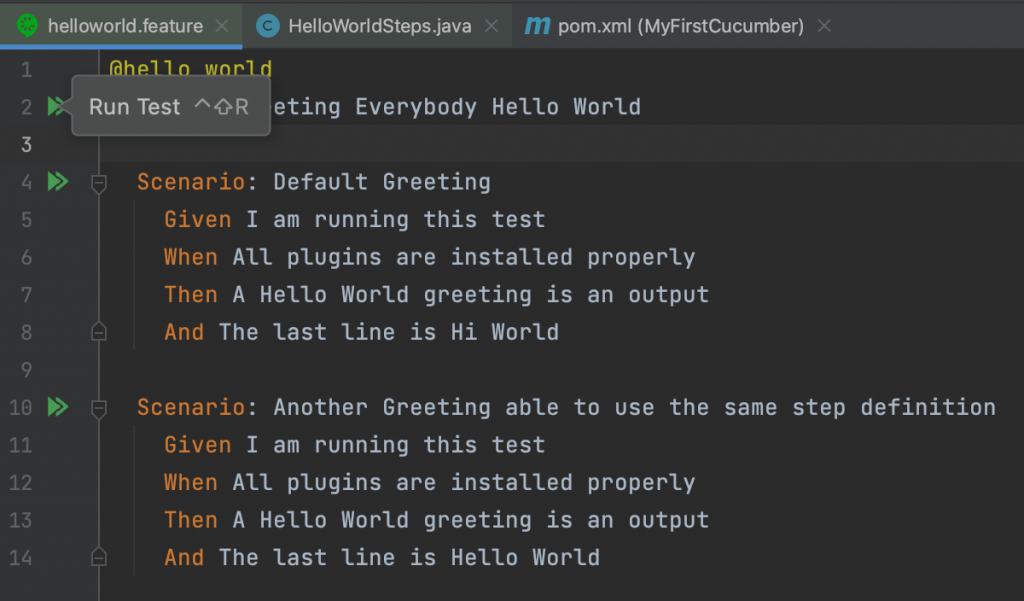
Since I already defined the necessary plugins cucumber-junit, cucumber-java, cucumber-testng and junit in my pom.xml file and ran the build in IntelliJ, I should be able to run my cucumber tests directly in my IDE. Inside my helloworld.feature file, notice the play button in the screenshot above. This allows me to run my test scenarios individually or all of it.
Using JUnit to run tests in Cucumber
We can also use JUnit framework to run our tests in Cucumber by creating a Test Runner class. This time, I created another package called runner and inside is my JUnit test runner class.
package org.example.runner;

import io.cucumber.junit.Cucumber;
import io.cucumber.junit.CucumberOptions;
import org.junit.runner.RunWith;

@RunWith(Cucumber.class)
@CucumberOptions(
        features = "src/test/java/org/example/features",
        glue = "org.example.steps",
        tags = "@hello_world or @another_test",
        stepNotifications = true,
        plugin = {"pretty", "html:target/cucumber.html",
                "junit:target/cucumber.xml",
                "json:target/cucumber-report.json"},
        monochrome = true
)
public class HelloWorldRunner {
}
Let’s take a look at the parameters in @CucumberOptions(...).
- features – Path to feature files package
- glue – Path to step definition package in dot notation
- tags – Tag expression that matches those defined inside the feature files. In this example, feature files that has the tags
@hello_worldor@another_testwill be triggered. - stepNotifications – Publish reporting generated from the step definitions when it runs.
- plugin – Allows you to create custom reporting using plugins. In this example, we will generate reports in HTML, JSON and XML formats.
- monochrome – Formats output in your console.
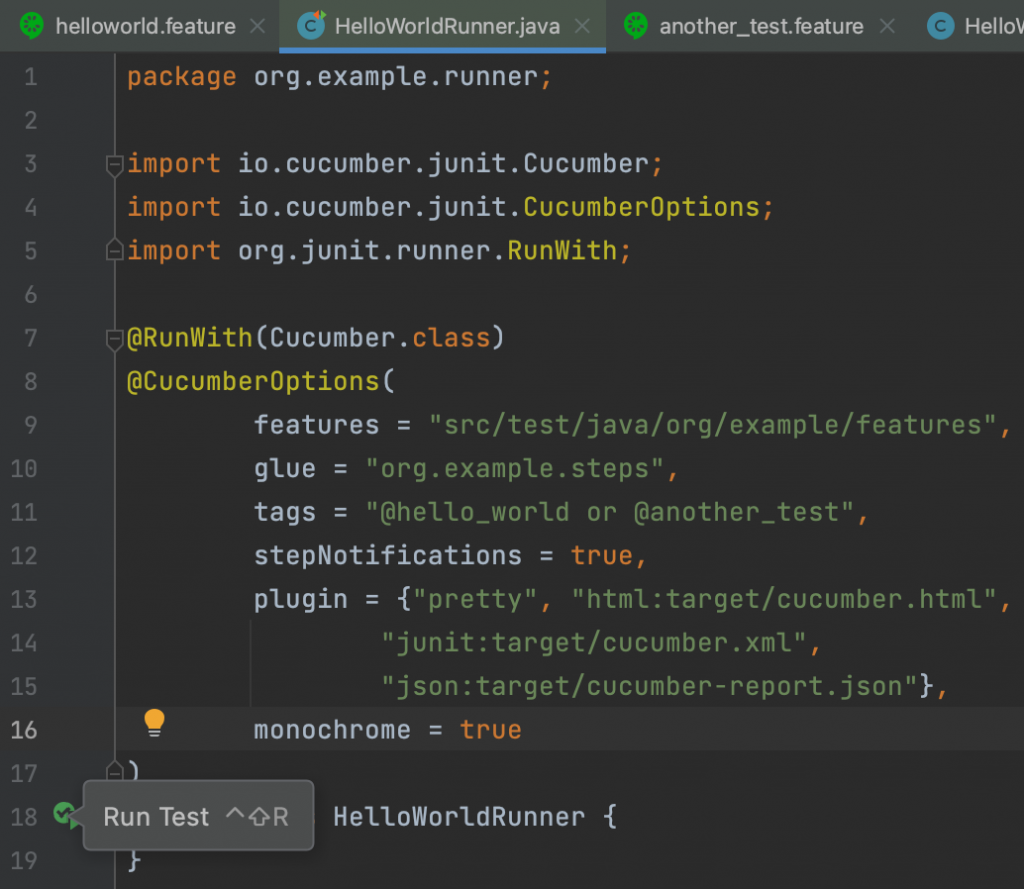
Similar to the Cucumber feature file on my previous example, you will notice that my test runner class also has a play button. By running my test here, it will trigger all of my test scenarios that has either of the tags @hello_world or @another_test.
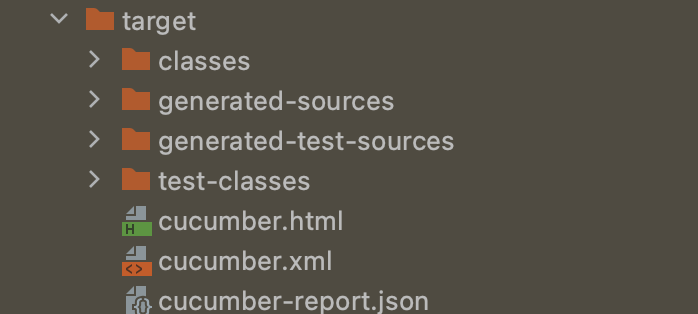
After running the test through JUnit, it generated the reports based on the results from my Cucumber feature files. This is useful if you plan to integrate the reporting in your CI/CD tool like Jenkins.
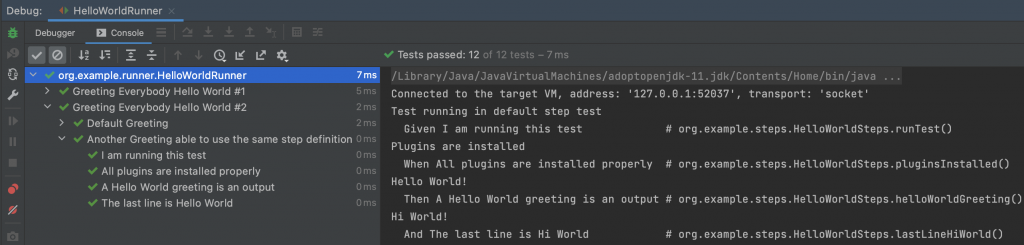
Moreover, the console output is also formatted with the result. This is nice to have while working on your test scenarios and you need to do some debugging.
That’s it for this tutorial! I hope that you will be able to create your own Java Maven project and use Cucumber JUnit for your next systems testing.