Deploy containerized application in Kubernetes

How to use Minikube to set up a Kubernetes cluster in localhost? How to deploy containerized application in Kubernetes Pod and expose to the internet?
Install Kubectl and Minikube
We only need to install two libraries. First is the kubectl CLI tool for Kubernetes which I have mentioned in my introduction. To install this on MacOS, I used Homebrew.
brew install kubectl
You have other options if Homebrew did not work for you. Please check their official guide for Installing kubectl on macOS.
If you have Linux machine, they do have a guide for Installing kubectl using native package management in Debian and Red-Hat based OS.
And of course, you can follow their official guide for Installing and Set Up kubectl on Windows.
Verify that kubectl has been installed properly.
kubectl version --client
A second library that we need to install is Minikube. Here is the command for MacOS.
curl -LO https://storage.googleapis.com/minikube/releases/latest/minikube-darwin-amd64 \
 && sudo install minikube-darwin-amd64 /usr/local/bin/minikube
For stable release in x86-64 Linux.
curl -LO https://storage.googleapis.com/minikube/releases/latest/minikube-linux-amd64 \
 && sudo install minikube-linux-amd64 /usr/local/bin/minikube
And for Windows, you will need to run a command in Powershell. Please check the Minikube getting started official docs.
Localhost Setup of Kubernetes with Minikube
In this tutorial I will be using Minikube to set up my local Kubernetes Cluster. I will be using Docker as container manager to deploy a single node cluster running on a MacOS machine, but you can also apply the same setup and most of the commands that I will be using here if you have a Linux machine.
In a production setup, Ideally you have a separate master and worker server nodes. But for the purpose of this tutorial, a single node will be enough.
After installing Minikube, you will need to apply the driver for deploying your cluster nodes. As I have mentioned, I will be using Docker.
minikube start --driver=docker
If you want to use a virtual machine instead of containers to deploy your node, you can also use a Hypervisor like Virtual box.
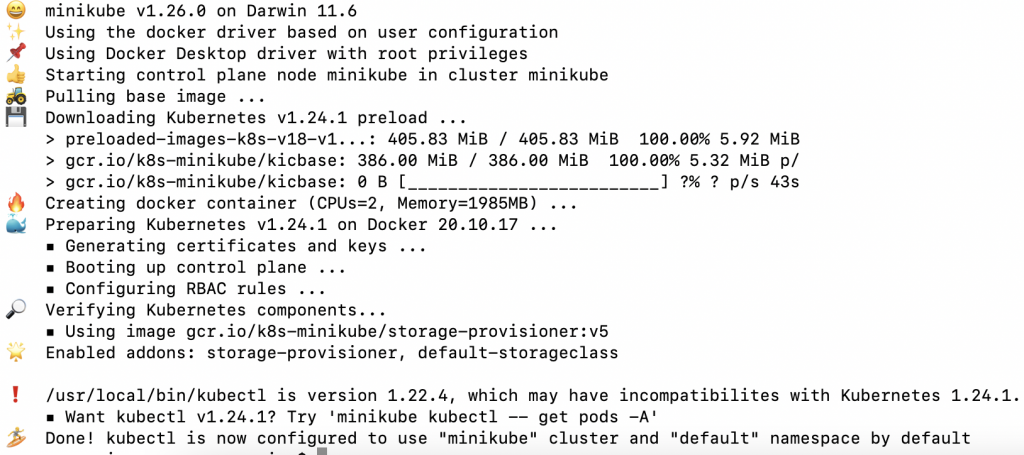
Minikube set up of the Kubernetes cluster will take a while to install. You can check the status when it’s done.
minikube status
Verify the cluster configuration if it’s up and running.
kubectl cluster-info
And since I’m using Docker to deploy my Nodes, there should be at least one container up and running.
docker ps
Access to Local Kubernetes Dashboard

Once your Kubernetes Cluster is created, you should be able to access the Kubernetes dashboard within Minikube.
minikube dashboard
This command will automatically open the Dashboard in your default browser. What Minikube does is it exposes a Port in localhost 127.0.0.1 and every time you run this command you will get a new port number to access.
Pod Deployment
We already know that a Pod is the smallest computing unit of resource you can deploy in Kubernetes and that a container runs inside a Pod (Read about Kubernetes Objects). So now let’s deploy our containerized application in a Kubernetes Pod!
For this tutorial, I already prepared a FastAPI web application that will run in a Uvicorn server. And I have already generated a Docker image that is hosted in Docker Hub. If you want to see what’s inside this application, you can download the codebase in my Github repo. Otherwise, all you need is the Docker image.
Imperative Pod Deployment
I want to show first how to deploy a Pod using the imperative approach to get us familiar with kubectl commands.
Create a Deployment object named “webapp-for-testing”. And the container Image to use is rexresurreccionhome/webapp-for-testing.
kubectl create deployment webapp-for-testing --image=rexresurreccionhome/webapp-for-testing
I mentioned earlier that the image I will use to deploy a Pod is hosted in Docker Hub. It should be noted that the image must be accessible online or within your network. That is because your deployment will download the image inside the Pod, within the Kubernetes cluster. That means if your image is created only on your local machine, it will not work.
Get the Deployment resource. If it runs without an error, you should see in READY column 1/1.
kubectl get deployments
Get the Pod resource. If your deployment is a success, you should see one Pod that has READY 1/1.
kubectl get pods
Check out other resource you can pass as parameter to kubectl get command.
kubectl api-resources
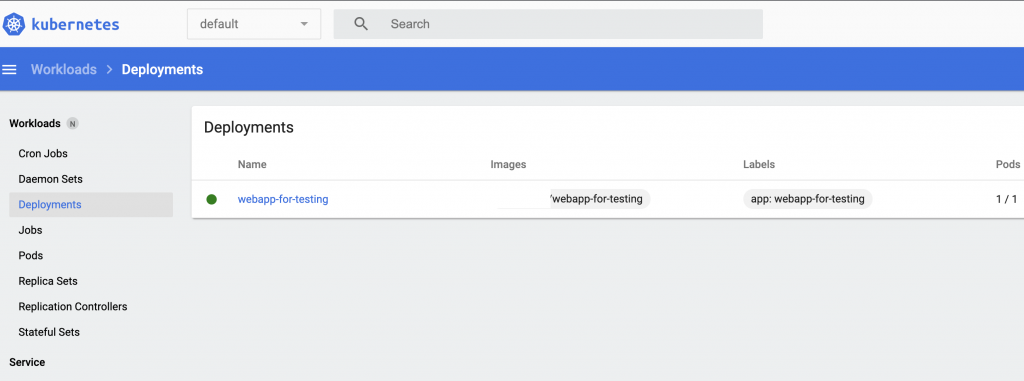
My deployment has 1/1 Pod created successfully!
Exposing the Pod/Container to the outside world

The status of my Pod is “Running”. Therefore, I should be able to access my API endpoints. Right? Well, not yet. The application container was successfully created but we have not made it exposed in the Kubernetes Cluster or to the outside world. It’s like running your application web server in a localhost, accessible only inside the container.
The next thing we need to do is create a Service object to expose our Pod’s network.
kubectl expose deployment webapp-for-testing --type=NodePort --port=8080
In this command, I specified the deployment resource I want to expose the network for webapp-for-testing. Then the type of exposure is NodePort. Again, I mentioned in my previous topic about Service object and the type of exposures you can define. Since I want to make my application accessible outside my Kubernetes cluster, I can use NodePort. And if your network infrastructure supports load balancing, which Minikube does, you can also use LoadBalancer. At this time, I only have one replica for my Pod so I will just use NodePort. Lastly, I specified the port number my application is using in my container, that is 8080.
Get the Service resource. If it runs without an error, you should see the Cluster private IP assigned to your deployment and the TCP port being exposed.
kubectl get services
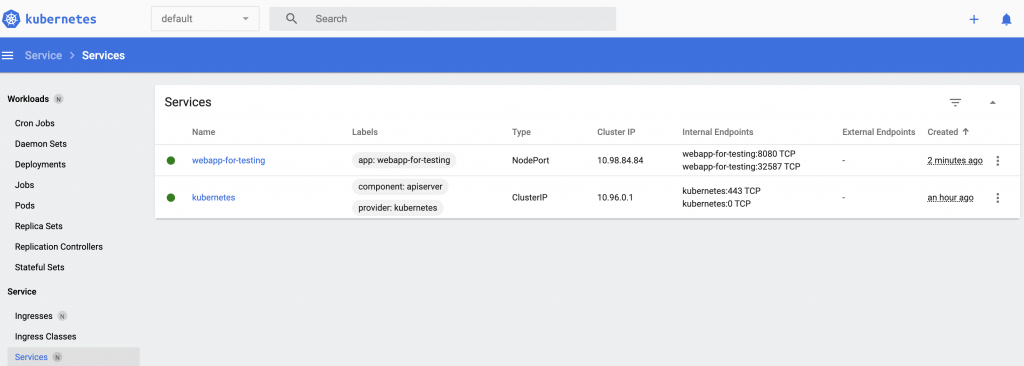
You can also see the Service information on the Kubernetes dashboard. But notice the “External Endpoints” is blank or if you check the command again to get the Service resource, the “EXTERNAL-IP” is empty. That means I still could not access my API Endpoint because there is no public IP address.
Minikube Tunneling Service
If this was hosted by a cloud service provider, I will get an external IP. But with Minikube that is not the case. That is because Minikube node is only running in a container or virtual machine. And to expose a temporary special IP address within Minikube node to my local machine, I need to run a Minikube specific command to do this.
minikube service webapp-for-testing
In here, I’m asking Minikube to set up a tunnel for my Service resource “webapp-for-testing”.
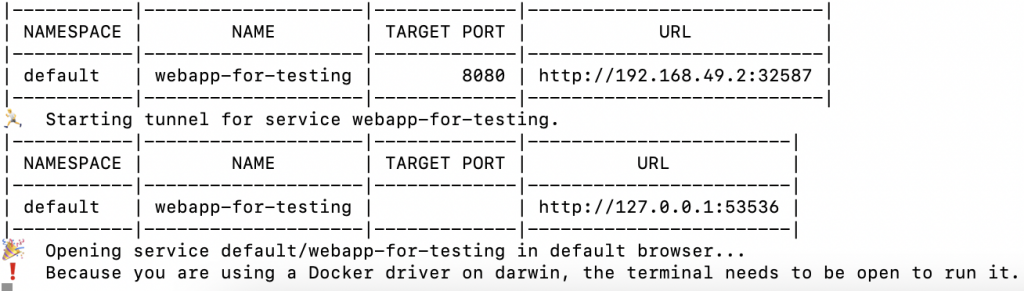
Now I can access my API endpoint through the exposed URL http://192.168.49.2:32587.
Managing Deployment
We’ve made some good progress in this tutorial! We managed to deploy a containerized application in Kubernetes already. And to extend our learning, I want to show some commands for managing a Deployment resource.
Scale the number of Pods for your application. In this example, I expanded my replica sets to two. If you check again your Pod resource, you should see two Pods this time.
kubectl scale deployment/webapp-for-testing --replicas=2
Set a new image for deployment. So say you pushed a new version of container image and you want your Pod(s) to redeploy. The new image I want my container to use in this example is rexresurreccionhome/webapp-for-testing:latest.
kubectl set image deployment/name-of-deployment name-of-container=rexresurreccionhome/webapp-for-testing:latest
When you created a Deployment, you would want the ability to manage the rollout of that resource. In here, I’m checking the status of a deployment rollout.
kubectl rollout status deployment/webapp-for-testing
Undo or rollback one deployment before the current rollout version.
kubectl rollout undo deployment/webapp-for-testing
View rollout history. The result of this command will show the revision number that you can use to inspect or rollback later to a specific rollout version.
kubectl rollout history deployment/webapp-for-testing
Inspect a rollout version.
kubectl rollout history deployment/webapp-for-testing --revision=2
Rollback to a specific revision number.
kubectl rollout undo deployment/webapp-for-testing --to-revision=2
Delete a resource object. For instance, you don’t want to expose your Pod/Container to the outside world anymore or you want to delete all your Pods within a Deployment resource.
kubectl delete service webapp-for-testing
kubectl delete deployment webapp-for-testing
Purge local Kubernetes Cluster
This is the end of my tutorial for Deploying containerized application in Kubernetes. Now let’s make sure to free up some resources in your local machine by deleting our Kubernetes Cluster. Conveniently, this is all managed for us by Minikube.
minikube delete
Summary
In this tutorial, we’ve learned how to Install kubectl and Minikube. We learned to use Minikube to create a local Kubernetes cluster. We’ve seen what’s inside a Kubernetes dashboard. We now know how to use the Imperative approach to create and manage Kubernetes objects like Deployment, Pods and Services. We managed to Deploy a containerized application in our Kubernetes cluster. And lastly, we’ve explored the rollout commands that may come handy when working on Kubernetes Deployments.
In my next tutorial, we will continue to learn deployments of Kubernetes objects. But this time, we will be using the Declarative approach, which is the recommended way of managing Kubernetes object.